Bar Swap: How To Measure Handlebars For Your Harley

There are two key factors you need to consider when swapping out the handlebars on your Harley-Davidson. First you need to choose a style then you need to figure out the bar dimensions you want/need. Determining the style can be somewhat of a daunting task as there are so many different styles to choose from Apes, Z-Bars, Drag Bars, etc. Once you figure out the style of bars you want you need to check a few measurements (height, width, pullback etc) to make sure the bars will provide the comfort and riding position you desire.
While you may spend hours perusing hundreds of images of different handlebar styles, determining the dimensions you need is pretty simple. All you need is something long and straight like a broomstick, a piece of string with a nut or washer tied to the end of it, a tape measure, someone to take all the measurements, and a pen and paper to mark down all your dimensions. You can take all the measurements with the stock bars on or off the bike.
There are three basic measurements you are going to take to determine your handlebar dimensions: rise/height, pull back, and width. Starting out sitting out on the motorcycle, grasp the broomstick in your hands and stretch your arms out to where you feel you want your new handlebars to reside. Next have your buddy measure the distance between the outside of your hands (pinky to pinky). This will give you your overall width.
Next, tie the string to the broom stick (in the middle of your overall grip) so that it hangs down like a plumb bob. You can then determine the pullback by measuring from the center of the handlebar to the string.
The rise/height can be measured from the center of the center of the handlebar to center of the broomstick. If the broomstick isn't resting directly above the handlebar it's often easier to use a straight edge, or a long level if you have one, to make a right angle from the handlebar to the string to get the most accurate measurement. This way your buddy can mark where the string and straight edge meet and then measure the distance from the mark on the string up to the center of the broomstick to determine the height.
Once you have those basic measurements you can then begin your research to make sure the style of bars you like will work/fit with your ride. If you are going to add taller, shorter, or pullback style risers to tour bike you need to factor their height/pullback measurements into your handlebar selection as well. As you search you may find that some aftermarket manufactures use different terminology such as backsweep or upsweep, measure a bit differently (measuring from the bottom of top of the bar rather than the center) or have additional measurements such as center width, knurl width or end rise. When you encounter scenarios like this determine their measurement points and factor them into your measurements or re-measure using their measurement points.
Know Your Terms
| Some of the various terms to be familiar with when measuring or shopping for handlebars for your Harley are: | |
|---|---|
| Bar Diameter/Thickness | The stock handlebars on Harley-Davidsons are 1" thick across the entire bar (this the outside diameter), some companies refer to this as "thick". You may come across bars refered to as "chubby" or "fat" that means the OD/thickness is larger than stock. Many companies offer handlebars in either 1-1/4" thick or 1-1/2" thick for a beefier and more stout appearance. These larger diameter bars are usually thicker in all areas except the hand control and clamp area. In these areas the bars taper down to 1" to allow for fitment with stock controls and risers. |
| Overall Width/Bar-end Width | This is the overall measurement from bar end to bar end. |
| Center Width | This is the distance of the flat portion in the middle of the handlebar before the bars rise, bend or pullback. |
| Knurled | A process that adds texture/roughness to the bars so the bar mounts or risers will get a better bite. Typically you'll see two 1" sections of lines or grooves that have been machined into the clamping area of the handlebars. Sometimes the knurled areas feature a crosshatch pattern. |
| Knurl Width/Clamp Area | This is the distance in reference to the knurl marks or where the risers will clamp onto the bar. Knurl marks can be measured center-to-center, outside-to-outside or distance between knurl marks. |
| Height/Rise Height | This is the distance from the center of the flat portion in the middle of the bar to the center of the highest point on the handlebar. |
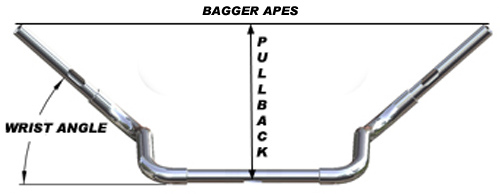
| Pullback | Distance bar ends pullback from center line of the middle of the bar |
| Sweep/Bar-end Sweep/Wrist Angle | This is the angle the end of the bar sits at in relation to the bar center/the angle of your hand placement. |
| End Rise | This is the measurement from the middle of bar center to middle of the bar end. |
| Drilled | This means that small holes have been drilled into the underside of bar ends (where the hand controls will sit) and directly in the middle of the clamping area to allow you to run your switch wiring internally if you want. |
| Dimpled/Swedged | This means that the underside of the bar ends have been pressed in to create a small indention/channel to allow for the switch wiring to be run externally without the control housings pinching the cables. Some handlebars are dimpled and drilled to give you both options. |
With this information you should now have a pretty good understanding of how to measure and identify the correct handlebars for your ride.


