
How To Change A Motorcycle Tire
You can save quite a bit of money by doing most of your own service and maintenance work on your motorcycle. Sure, more in-depth things like full engine rebuilds may be beyond most people's skill level and should be left to the professionals, but thing like oil changes and brake services can easily be performed in the average home mechanic.
One thing some people often get intimidated by is changing their dirt bike tires. If you have the right tools and take your time you can become pretty proficient at MX tire swaps. We stopped into the Chaparral Motorsports Tire Dept so we could show you how easy it is to remove and install a dirt bike tire.
Getting Started

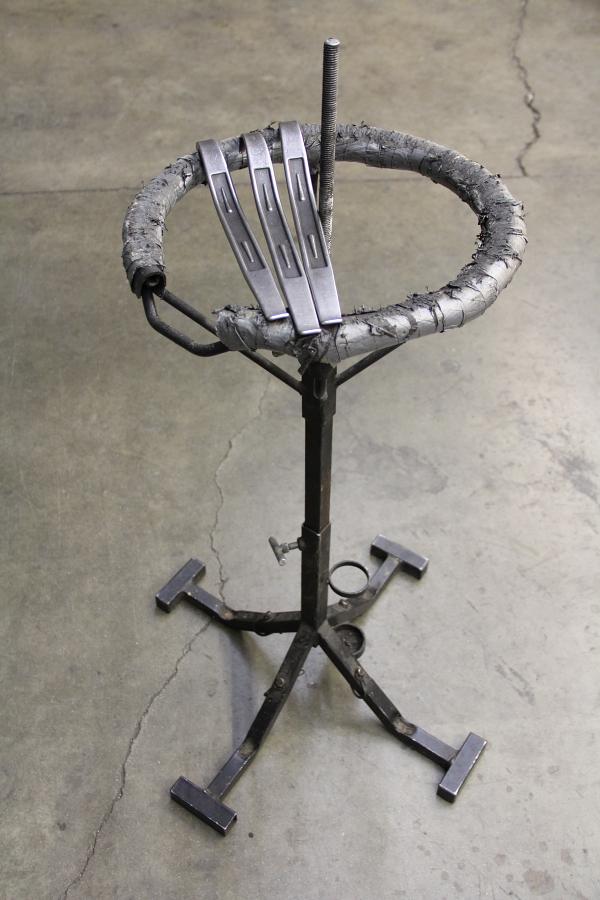
When it comes to performing your own dirt bike tire changes it's best to have the right tools for the job and it all starts with a good set of tire irons. The Extra Long Tire Iron from Motion Pro is very handy because the long length provides extra leverage and you can work with either the curved or straight end depending on your needs. They are sold individually, experts can usually get away with only two tire irons but having three on hand is makes the job much easier. While not absolutely necessary, a tire changing stand can come in very handy and make the tire changing process much easier. Seen here is an Ocelot Stand Up Tire Changing Stand $92.08. With its adjustable height this stand can really save your back, and the rim cage provides a solid and sturdy place for the wheel as you work.
Step 1: Remove the Valve Core

To get started, remove the valve core and then loosen up the nut on the rim lock. You don't want to remove the nut completely, just make sure the rim lock moves freely by pushing on the stem. If it's your first time changing a rear tire you may want to start on the rotor side as it'll be easier on your knuckles when you start working on the jagged sprocket side.
Step 2: Break Off the Tire Bead

Next, we use the narrow end of one of the tire irons to break the tire bead off the inside of the rim. Push the tire iron between the tire and rim and then leverage the iron downward and the bead should break loose. Repeat the process in several spots around the rim to completely release the bead from the rim.
Step 3: Lift the Lip of the Tire Over the Rim

Once the bead is free grab a second tire iron and then dig in a couple inches on either side of the bead lock. Use the tire irons to lift the lip of the tire over the rim. Hint: spraying a little bit of soapy water on the tire as you work can help the tire slip on and off the rim easier.
Step 4: Get the Whole Tire Over the Rim

Continue working the tire over the rim with the tire iron. It's easiest to take small bites out of the tire (move the tire iron around the rim only a couple inches at a time) rather than trying to lift a larger chunk of tire over the rim. If you find you're struggling to get the tire over the rim move the tire iron back an inch or two from where you were just working.
Step 5: Deflate the Motorcycle Tire

Once you have the first side of the tire off the rim you can then remove the tube. If your tube is in good shape and you are going to try and reuse it, fold it up to help get all the air out.
Step 6: Detatch the Tire from the Wheel

Next, flip the wheel over so that you can work on the other side. There are two ways to get the other side of the tire off the rim. You can either work downward and push the tire off the bottom side of the rim or you can work upwards and flip the tire over the top side of the rim. Similar to the other side start by working two irons on either side of the rim lock. Once you have the top lip of the tire over the rim it should free up the tire enough so that you can use a tire iron to push the tire down and off the rim.With half the tire off the rim you can use your hands to push the tire the rest the away off the rim.
Step 7: Inspect The Motorcycle Tire and Wheel

Once the tire is off the wheel check the rim lock and rim band to make sure they are in good shape before installing a new tire.
Step 8: Install a New Motorcycle Tire
If you are satisfied that the wheel is in good condition then it's time to start the process of installing a new motorcycle tire. Before installing the new tire be sure to inspect it inside and out to make sure there are no issues or defects with the tire.
Step 9: Rim Lock

When installing the new tire start at the rim lock. Make sure to push the rim lock all the way down so that the bead of the tire will sit underneath the rim lock.
Step 10: Start at the Valve Stem

With the rim lock situated on the tire start working the tire onto the rim starting at the valve stem hole in the rim. Used a tire iron to lift the bottom side of the tire over the rim.
Step 11: Secure the Motorcycle Tire onto the Wheel

Once you get the bottom side over the rim, use a tire iron to push the top side down at the valve stem hole so that you can get the tube/valve stem situated on the rim. Hint: Some people like to sprinkle baby powder inside the tire to help the tube slide and prevent it from getting bound up/pinched when airing up.
Step 12: Slide the Tube Completely Inside the Tire

Next, slid the tube into the tire and make sure that the tube is all the way inside so it won't get pinched by the tire irons when you start working the tire onto the rim.
Step 13: Apply Soapy Water to the Motorcycle Tire

After lubing the tire with some soapy water, start working the top side of the tire onto the rim. Just like before, start with two tire irons on either side of the rim lock and make sure not to get a hold of the tube as you work the tire onto the rim.
Step 14: Motion Pro Bead Buddy II

A little trick and another tool to help things go a little easier is a Motion Pro Bead Buddy II. The topside of the Bead Buddy locks around one of the wheel spokes and the bottom side keeps the bead in place. Make sure to take small bites on the top side of the tire with the tire iron and work the tire the rest of the way onto the rim.
That's A Wrap

And that's all there is to it. Just make sure the rim lock moves freely before you tighten down the nut and then air up the tire slowly as you set the bead on the rim. Air the tire to the recommended specs on the side wall.
Sidebar: Tools of the Road
Portable Tire Changing Stand With Bead Breaker

Even cruiser and street bike riders can perform their own tire changes with this Portable Tire Changing Stand with Bead Breaker from Ocelot Racing. Often the biggest struggle with changing your own street bike tire is breaking the bead of the tire off the rim, it can be a real pain if you don't have the right tool and you can end up scratching or damaging your wheel.
The nice thing about this tire changing stand is that the bead breaker lever is adjustable so you can get it set up perfectly on any size wheel/tire from 16- to 21 inches in diameter. Also, the length of the heavy duty handle makes it easy to get good leverage on really stubborn tires. It has a wide base to provide a solid working foundation and the fact that it's so compact means it won't take up a ton of room in your garage. The top ring is coated in rubber so it won't scratch up your wheel and will help provide a non-slip surface while working.
Motion Pro Rimshield II Rim Protectors

If you've got a really nice set of chrome or powdercoated wheels and are worried about them getting dinged and scratched up from the tire irons then a set of Motion Pro Rimshield II Rim Protectors can come in really handy. Made of highly durable resin, they slip over the lip of the rim and have an apron that provides a large protective surface for the rim lip and face of the wheel. Also, cutouts for your fingers make it easy to pull the rim protectors on and off the wheel.