
How To: Clutch Plate Replacement Presented By Vital MX

Without healthy clutch plates your dirt bike won't be performing as
it should, or worse yet, it won't be performing at all. There's a
couple way to tell if you are in need of servicing your dirt bike
clutch. You may notice that the engagement or feel at the clutch
lever isn't quite right. The motorcycle might not be delivering the
power as it should-especially under load. When stopped and in gear
you might notice the bike creeping forward even though you have the
clutch lever all the way in. Or you just might notice the burning
smell of the clutch plates spinning against each other.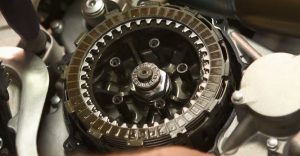
Changing your clutch plates on a dirt bike may sound intimidating
but it's really not that difficult. In fact all it really takes is
the right parts, some t-handles, a torque wrench, a clutch plate
removal tool or a pair of O-ring picks, and a screw driver. Of
course you are going to need a set of new clutch plates and
before you get started on the removal steps you should soak the new
plates in some fresh oil.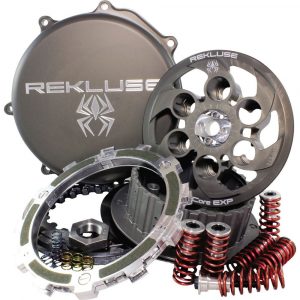
Since you're going to be digging into your clutch assembly it might
be a good time to consider upgrading to a something like a
Rekluse Core EXP 3.0 Clutch setup. This kit will reduce the
likeliness of the bike stalling in the event of crash and will
allow you to come to a complete stop or run at idle and low RPMs
without having to pull in the clutch lever. Or you could just stick
with the replacement clutch plates and seal it up with a new clutch
cover from
Boyesen to give your bike more of a factory look.
If you take your time, go step by step, and remember to alternate
between steel plates and fiber plates when installing the new
clutch plates it will be a painless process. Check out the video
below that Vital MX made demonstrating how to change your
clutch plates.
Tech Tips: Clutch Plate
Replacement on Vital MX